Hints, Tips and Recommendations:
Screen Colour and Colour Space
The Limitations of our Red Green Blue ( RGB) Displays can be Represented by a Very Useful Diagram
Display devices mix three colour or channels referred to as Red, Green and Blue (or RGB) to represent all of the shades and brightnesses of colour we can shown by modern digital photography.
The human eye can see more colours than can be represented on any current electronic display device. The total range of colours a human can perceive is shown on the CIE Chromaticity Diagram. The special feature of the chromaticity diagram, is that it shows the apparent brightness of the different colours in a uniform way. The amount of colour that a particular device can actually show is then represented by three points that show the extremes of purest red, green and blue that can be shown using that device. When these points are connected in a triangle that area shows the complete range of colours that can be shown. This triangular area this is known as the colour gamut of a device.
Standardised Colour Spaces or Gamuts: What should I use?
Equipment manufacturers, Microsoft and Adobe have designated standardised colour spaces or gamuts, which show different ranges of colours on computer displays.
Some gamuts are narrower than others and show a smaller range of colours. The standard ‘space’ or gamut is called sRGB because it is a standard that mixes the Red, Green and Blue additive primary colours used on display screens. sRGB is important because it is used on the internet, within camera club photography and by photographic federations.
Apple have also devised a colour space, called Display P3, which shows 25% more colours than sRGB of colours. It is like the colour space used in digital cinema but the the white point used on computer screens.
Adobe defined a Colour space in 1998, sometimes referred to as Adobe RGB (1998) that has a wider gamut. That space is sometimes used to edit and print pictures, however the appropriate software and software settings, display and printer are needed to make correct use of the increased colour range. Some printshops require that you submit images in JPEG format and thus in the smaller sRGB colour space.
However, as Jim Hamel says: “Even though it is technically the smaller colour space, I’ve just never noticed an actual real world difference between the two colour spaces. It isn’t like my pictures are being ruined because I chose a smaller Colour Space. No one has ever noticed.”
[For the technically minded it has been argued that the standard CIE chromaticity diagram exaggerates the perceived difference in green between Adobe RGB (1998) colour space and sRGB ( see this page of Cambridge in Colour for explanatory diagrams)]
Graphical Representation of the Colour Spaces
In the chromicity diagram below the range of colours in the sRGB and larger colour gamuts are illustrated.
Note: Colour gamut (or space) can only really be represented as a volume because different levels of brightness need to be represented. You would need to be able to ‘fly’ through that volume to see the range of colours that are encoded.
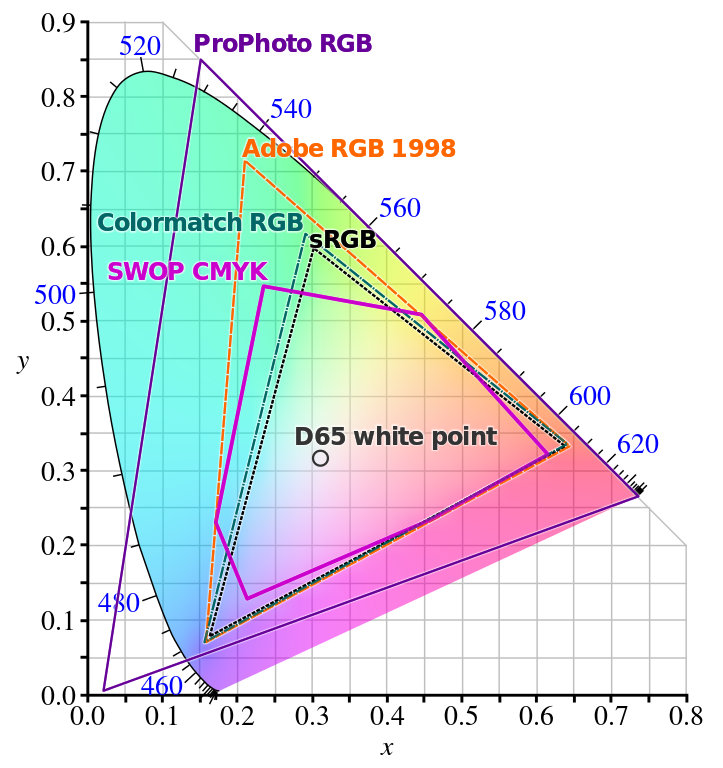
A representation of the sRGB colour space. The white D65 point represents the appropriate colour balance for the white point of correctly calibrated monitors. The D65 point represents a combination of illumination from the sun and sky at noon. (source Wikipedia)
(image source: https://commons.wikimedia.org/wiki/File:CIE1931xy_gamut_comparison.svg)
[There are in fact a large number of standardised colour spaces, that need not concern us amateur stills photographers. The reason for this is simple; our monitors are limited in the range of colours they display. Video is more complex.]
The Numbers Behind the Colours
The image below displays one million colours if looked at at full resolution on a big screen (or in other words one million 3-valued colour number sets).
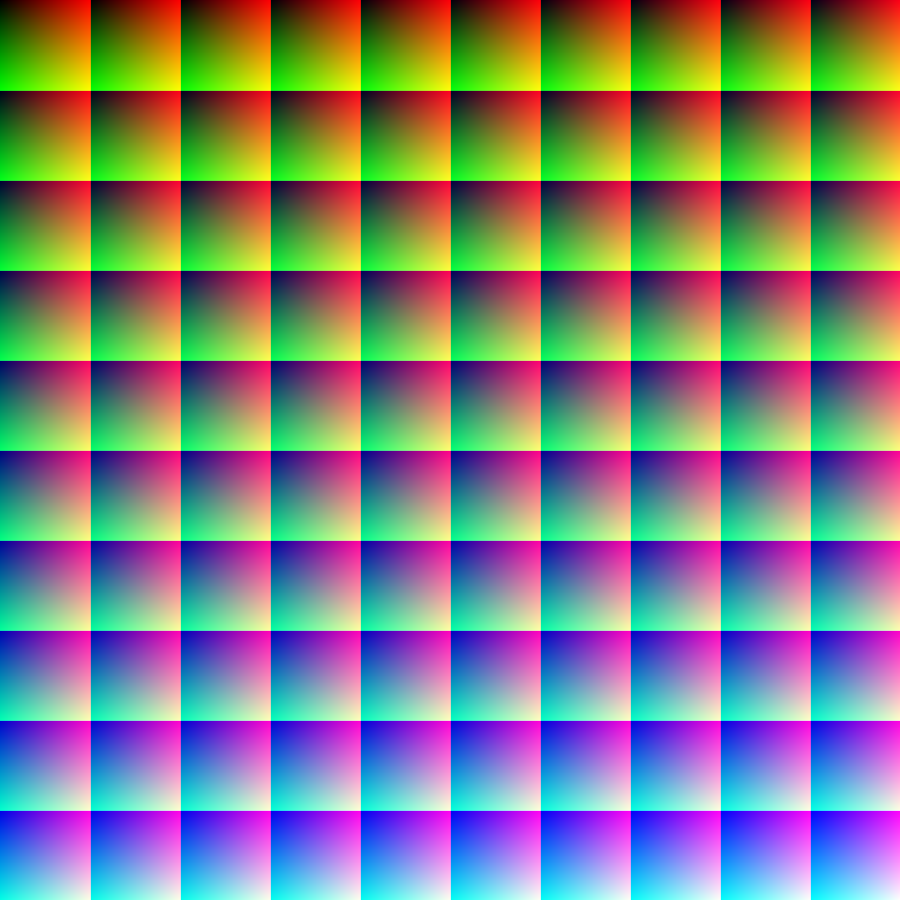
Image Source: https://en.wikipedia.org/wiki/RGB_color_space#/media/File:1Mcolors.png
Digital computers store colour values of images as a series of brightness values of the Red, Green and Blue channels that make up colour displays.
The average home or office computer monitor displays the sRGB colour space at 256 brightness levels per colour channel. In computer jargon that is called 8 bit since eight binary digits are needed to encode 256 grey levels for each (colour) channel. The term ‘Bit Depth’ refers to the number of bits used to store or display the information on a screen. Some more expensive displays can use higher bit depth, however you do not really need one.
Larger numbers mean brighter image values. At the bottom of the range 0-225 8 bit scale is Black with value of 0,0,0. The top of the range is white, which has 255,255, 255 for the Red, Green and Blue channels. In 8 bit sRGB colour space The Red, Green and Blue use a total of 24 bits which can encode 16,777,216 colours in total.
Greyscale Images
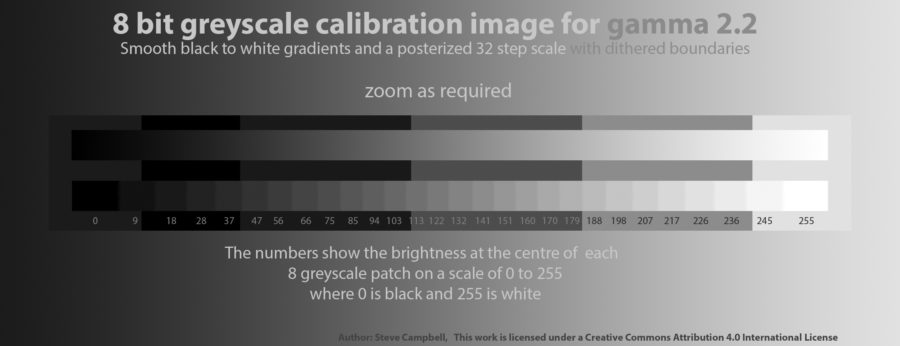
The greyscale image above shows the range of brightness values from 0-255. The red, green and blue channels all have the same value at every point on the image. If you are using a 24 bit (i.e. 3x 8 bit) colour monitor showing sRGB, which is properly set up, there should be no colour or obvious banding present in the background area.
Remember: Camera Sensors Capture a Wider Range of Shades Than We Can See or Display
The analogue to digital converters in modern camera capture at high bit depth. “For 8 bit, this results
in 256 shades, for 12 bit in 4096, and for 16 bit in even 65536 shades”. Modern high quality cameras operate with much higher than the 8 bit colour space. Nikon for example offers 12 and 14 bit RAW files. However, Gerhard Holst says “We live in and 8 Bit World“. In other words we cannot see the thousands of shades of each colour channel a that a good camera will capture. Some estimates place the number of colours a human can see to be around 10 million, although some women (but not men) who are functional tetrachromats can see many more.
“According to the researchers at New Castle University’s Tetrachromacy Project, standard RGB (i.e., red-green-blue) computer monitors are not capable of displaying the range of colors required to create a reliable online test for tetrachromacy:
“Unfortunately, computer screens do not provide enough colour information to be able to ‘tap into’ the extra dimension that tetrachromats may possess. It is therefore impossible for an online test to investigate tetrachromacy.” (see source)
However, it is important we use software that can work with RAW files that can store higher bit depth information. This allows us to manipulate the brightness in images without leading to obvious artefacts. Editing the gradient of blue sky stored as a 24 bit JEPG and captured with a phone camera can result in horrible banding. Adobe Photoshop Lightroom, for example, allows manipulation of the smooth blue gradient of a cloudless sky because it can work with RAW files in a larger colour space and at higher bit depth. If you wish to to make drastic changes to brightness and colour in Photoshop especially where there are smooth gradations of colour or deep shadows that you might wish to alter, in principle you are better working at higher bit depth in what Adobe calls 16 bit. ( Adobe ’16 bit’ files cannot possibly contain that amount of information because our amateur (and most professional) cameras do not capture in 16 bit. Nevertheless these files can be better manipulated to a much greater extent without producing unpleasant artefacts.
[For much more detailed information on this subject see: 8, 12, 14 vs 16-Bit Depth: What Do You Really Need?! Also see this experiment in editing after 12 bit and 14 capture: 12BIT VS 14BIT RAW AND COMPRESSED VS UNCOMPRESSED… DOES IT MATTER?.]
Colour Vision Deficiency
Some people have a colour deficiency so they will see fewer colour than others. You can try a free quick online test. The colour expert in the club, Alastair Smith, who was a BBC vision engineer, has tried the test with different displays in different lighting conditions and found that he had value ranging between 0 (perfect) and 4, so do not take the test too seriously. “Just remember, this is not a replacement for the full test!” as X-Rite say.
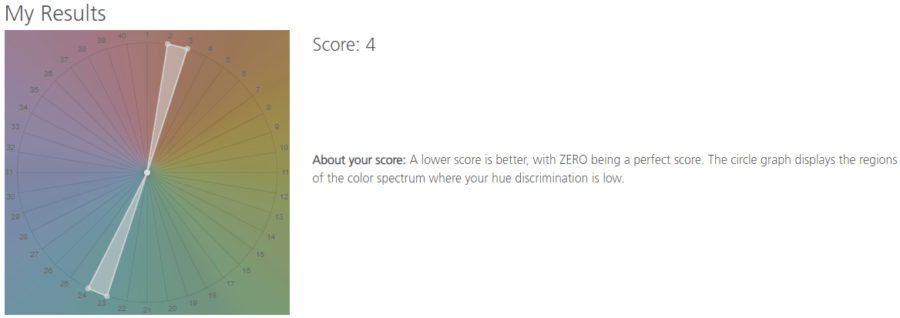
As you can see even in sRGB space I do not have the best possible score even with my best and carefully calibrated monitor.
Appendix 1
Why do we refer to colour temperature of light source (a more technical explanation)
When metals are heated, like the filament in an incandescent bulb, or a bar of iron in a furnace, they begin to glow. The colour of the light emitted is related to the temperature of the object. That temperature is measured in absolute degrees Kelvin.
The colour temperature of sunlight above the atmosphere is about 5900 K. However the atmosphere changes the apparent colour temperature of sunlight so we see obviously much redder light at dawn and dusk. The D65 point, used in computer screen calibration, approximately represents a combination of illumination from the sun and sky at noon in Northern Europe. In other words ‘white’ varies with the position of the sun in the sky. Similarly what your display shows is a white point (i.e. a particular type of white) you choose to use.
In more the technical language of physics and colour science, the temperature of an incandescent black body changes, as it goes from deep red at low temperatures through orange, yellowish white, white, and finally bluish white at very high temperatures. ( Source: Planckian Locus, Wikipedia)
For “lamps, which can only approximate the chromaticity of a black body, the corrected term correlated colour temperature is applied through a calculated chromaticity value” (source: a good tutorial at Olympus Life Sciences)
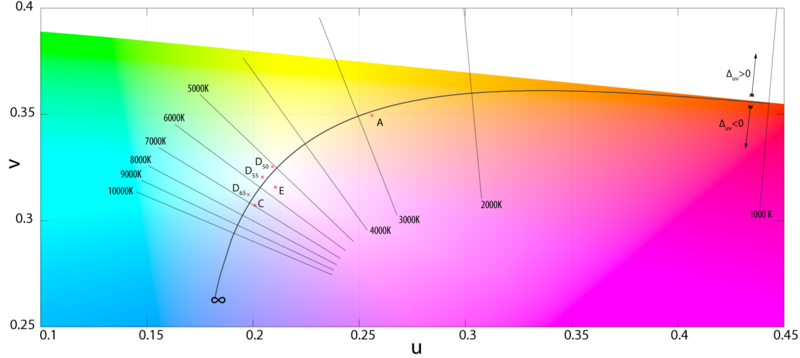
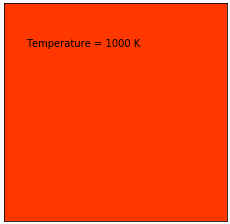
The colour of the animated square above will very approximately match the background white of the page when it reaches a colour temperature close to that of your monitor setting. The animation shows an approximation of the colour at numbered steps in the Planckian Locus (or curve in the previous diagram) through the visible spectrum.
Animation Source:https://en.wikipedia.org/wiki/Planckian_locus#/media/File:Planck_locus.gif
Appendix 2
If you really want to understand colour recording, of either video or stills, and know more about image display, you should take an in depth look at the excellent free teaching materials in this area.
More About Monitor Calibration and Soft Proofing
In addition to display calibration, the end of the first video below introduces the idea of soft proofing.
Tips and greyscale image by Steve Campbell