Hints, Tips and Recommendations: Focus Stacking
Understanding (Macro) Lens Characteristics: Choosing the ‘Sweet Spot’ for Aperture
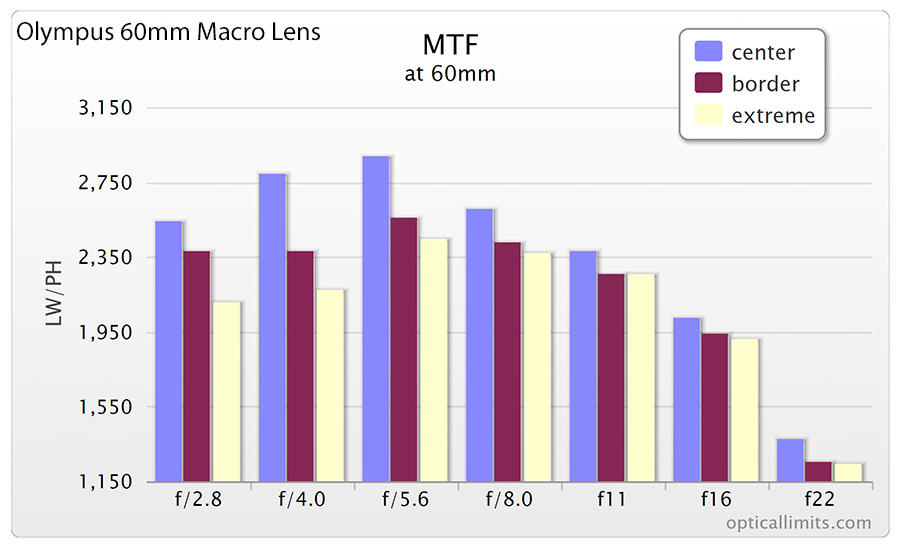
In order to create really high resolution and contrast macro images with a prime macro lens and focus stacking you might want to find the aperture that provides the highest central and edge-of-field resolution and ideally the lowest chromatic aberration.
For the Olympus 60mm macro the optimal aperture is about F5.6. That information was obtained by reading a lab test review at Opticallimits.com.
Understanding the Effect of Aperture and Depth of Field for a Lens
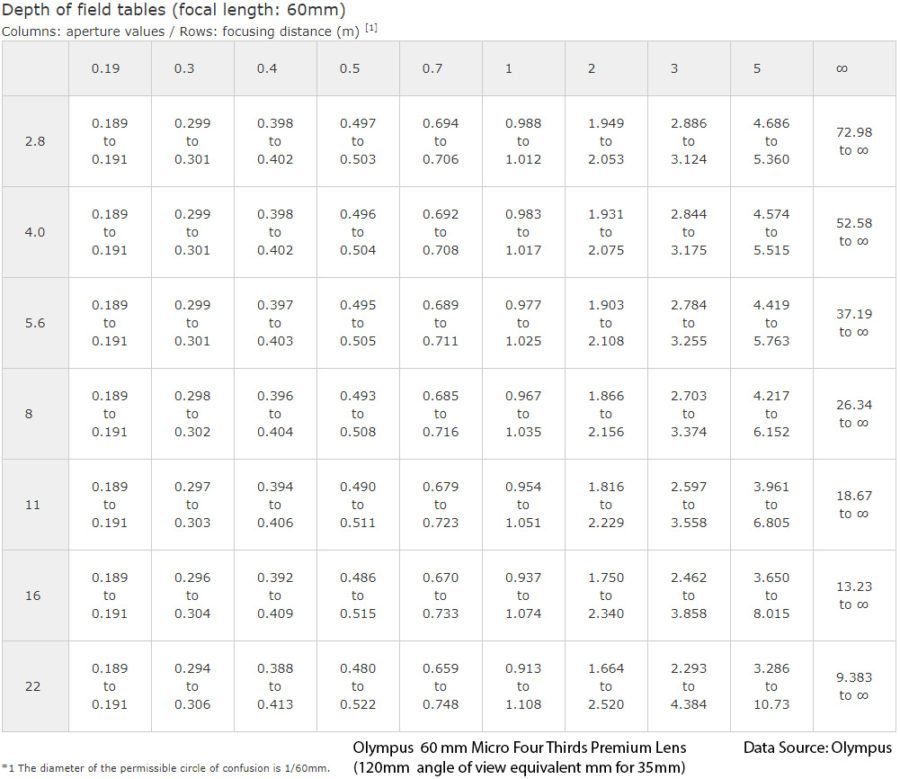
The problem with choosing the optimum aperture for high resolution is that it produces a very shallow depth of field.
It is therefore helpful to find a depth of focus table for your (macro) lens in order to understand how varying the aperture size will affect the Depth of Field.
Notice that for the Olympus 60mm lens, shown below, with the subject at 19 cm from the sensor, in the first column on the left, closing the aperture alters the depth of field by less than a millimetre, although it has a very large effect when the lens is focused on infinity (last column on the right).
Rick Littlefield has excellent generic Depth of Field Table tables for macro and landscape imaging.
Focus Stacking (even with Canon or Nikon Cameras)
In order to overcome the resolution limitations imposed by a small aperture use focus bracketing or in-camera focus stacking. Those techniques are most effective if the camera is attached to a tripod. If using the camera hand-held, shoot short bursts with a fast shutter speed and focus bracket rather than focus stack. If buying a new camera, consider its ability to do that automatically. If you own a camera that has neither of these automatic capabilities, just change the focus manually in a series of steps from near to far or vice versa, whenever that is easy to determine. If you own a Canon or Nikon camera you can purchase the Helicon FB tube to capture in automated focus bracketed bursts.
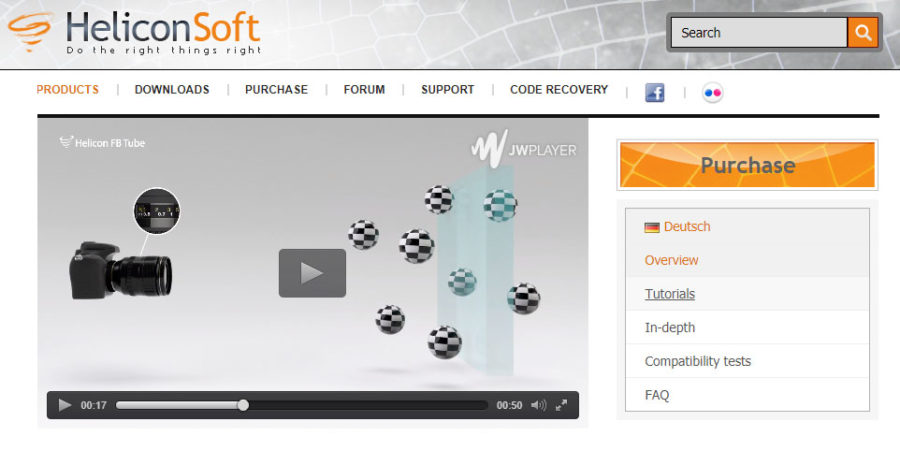
The Helicon FB Tube can add focus stacking to Canon or Nikon Cameras
Focus Stacking the Easy Way
Olympus in-camera stacking might be a hundred times faster to use, when it works. Occasionally the method is inadequate. High resolution sensor shifting mode cannot be used with in-camera stacking.
An in-camera stack of 15 images of a Waxcap fungus taken at F7, 1/20 second at ISO 200.

In Camera Stack at F8, 1/40 second
In-camera focus stacking is extremely quick and very convenient, however a better result can often be obtained by focus bracketing and then editing in good focus stacking software
Focus Bracketing Automatically In-Camera
Focus Bracketing vs. Focus Stacking
Focus Stacking Software
It is best to use specialist Focus Stacking software rather than a general purpose product like Photoshop. Although Photoshop can be used to automatically align and stack a series of images, it does not give the best focus stacking results. Photoshop does however make a very good job of stack alignment.
The two leading focus stacking programs are Helicon Focus and Xerene Stacker. Helicon Focus Pro is much faster, can cope with RAW files, can output DNG files from RAW and has good focus retouching capability, so I use that. Nevertheless, the auto-alignment of hand-held images is in my experience inferior to Photoshop. Please note that although Zerene Stacker can use 16 bit Tiff files, which are not Zip compressed, it does not handle RAW files directly. A free 30 day trial is available for both Helicon Focus and Xerene Stacker.
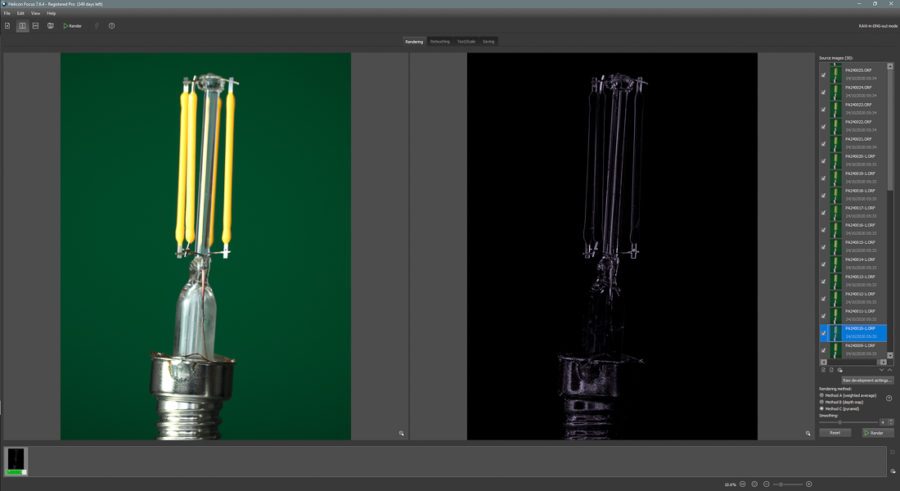
33 randomly ordered and manually focussed RAW images during rendering in Helicon Focus Pro.
Focus Stacking Examples

A junk food chocolate waver showing the lattice of sugar and tiny sugar particles. High resolution mode focus stack of 17 images with manually selected focus points. 60mm Olympus Macro Lens. Lit from the right.
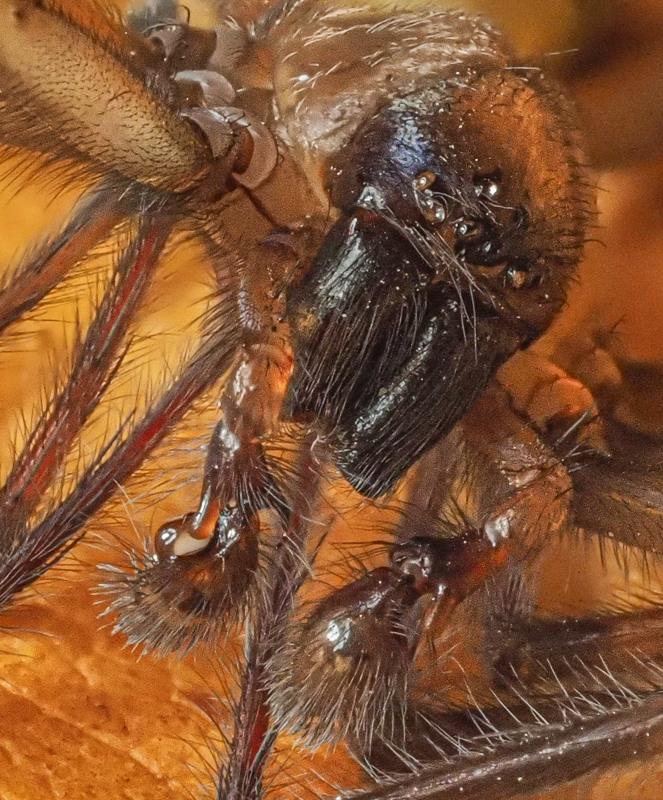
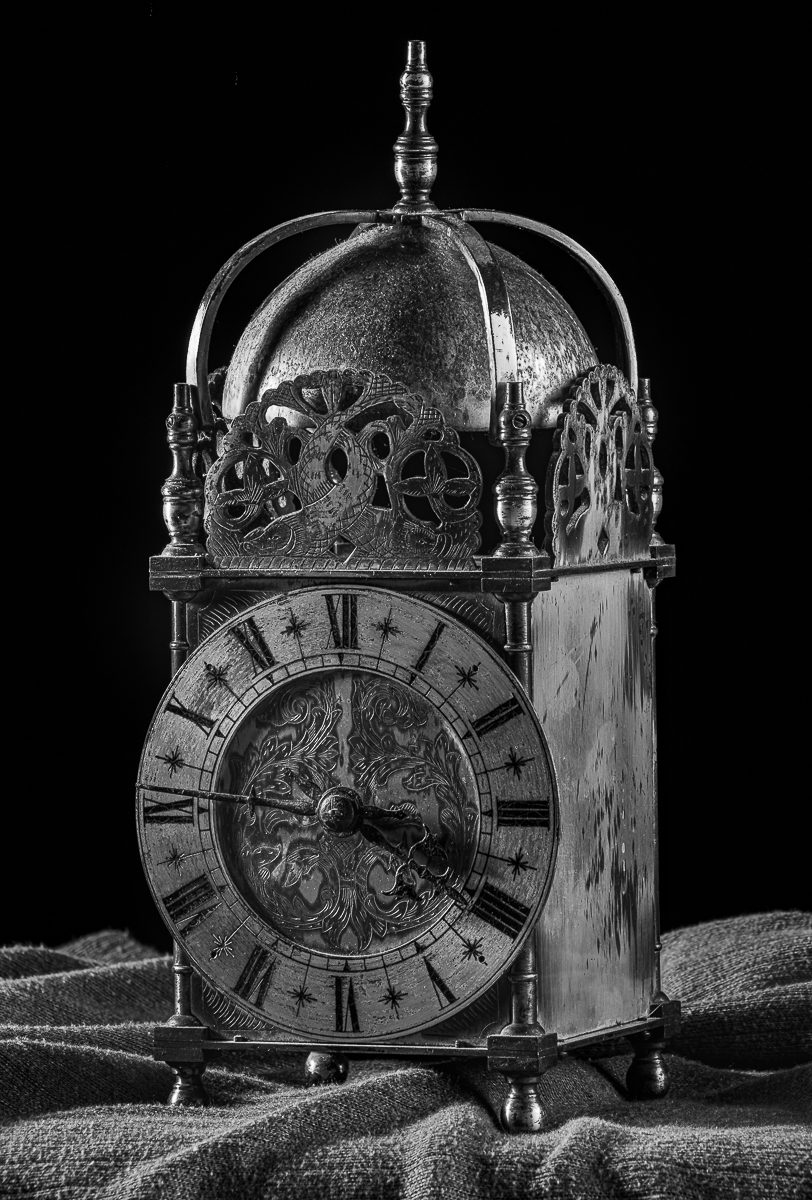
Focus Stack Portrait of a Dead Spider with the Olympus 60mm macro lens
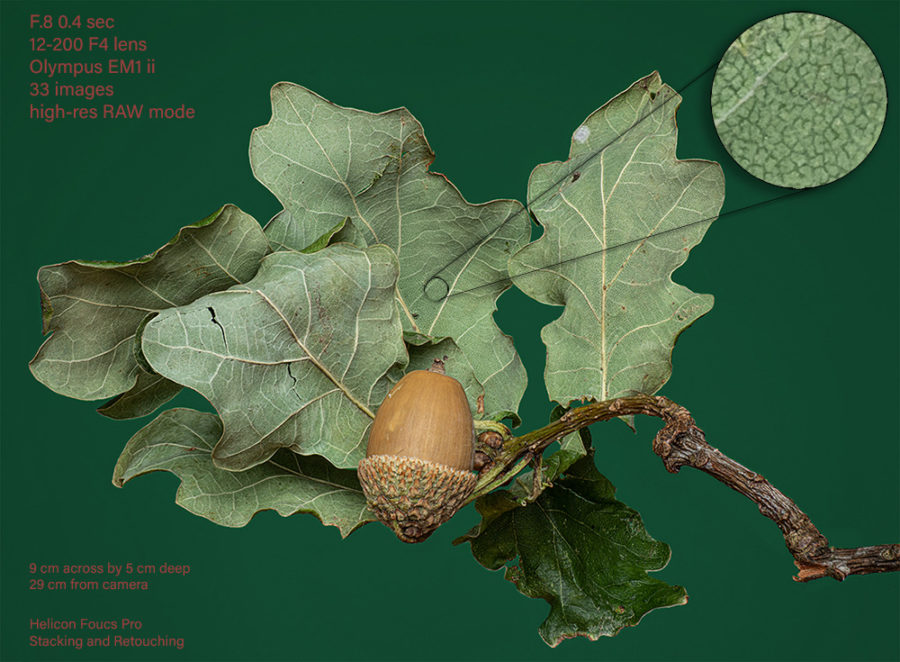
33 images in a 5cm deep subject of oak leaves, an acorn and twig taken in high resolution mode and stacked in Helicon Pro.
Manually focused 6-image stack captured at F6.3 and combined in Helicon Focus Pro using pyramid rendering.

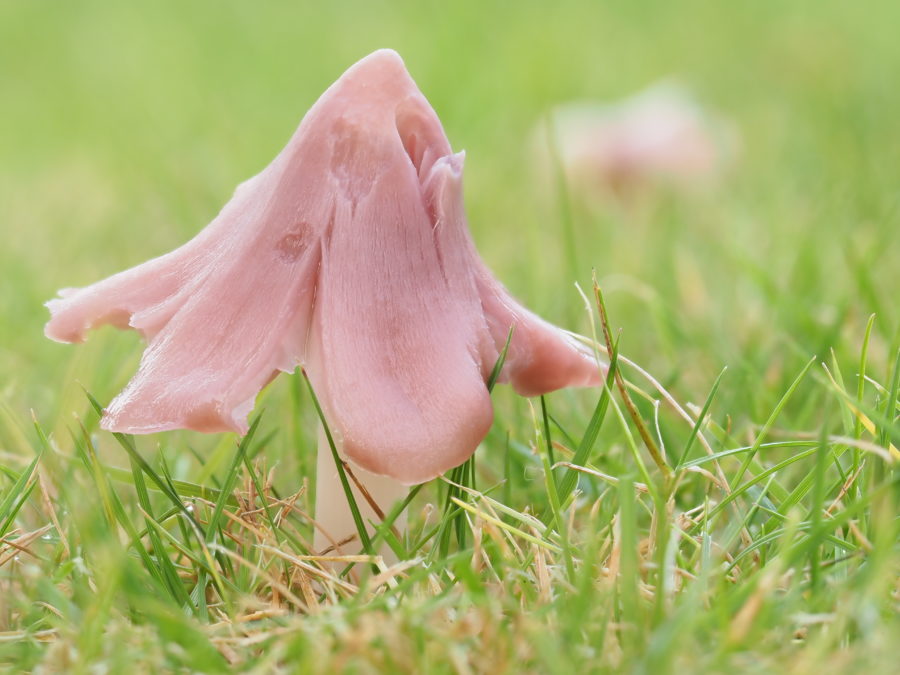
A hand-held focus stack of 5 images captured at F5 at 1/20 sec, stacked in Helicon Focus Pro. The image was created by rendering, followed by a complete focus retouch of the entire image using the same software.

1 image at F5 taken at the front of the hand-held stack.
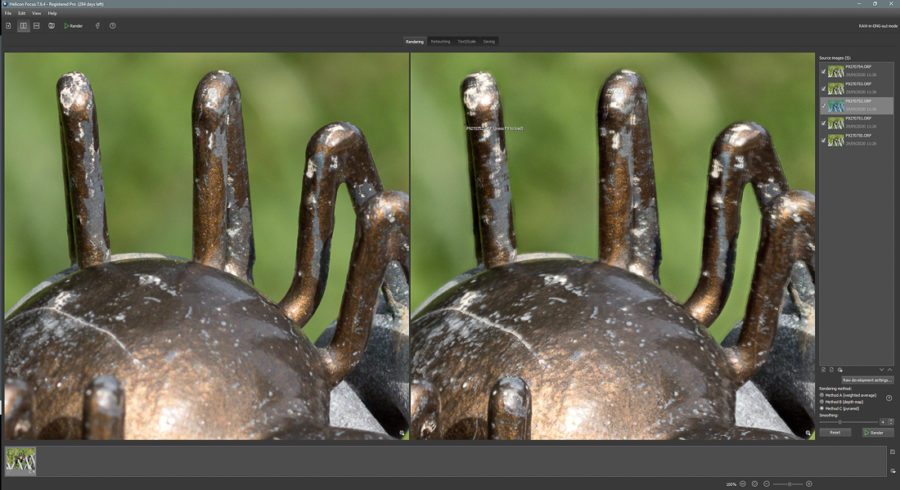
The rendered focus stack before completion of focus retouching in Helicon Focus Pro. The left window is one single image from the stack. The image on the right is the stack in the course of focus retouching. Notice in the upper part of the right hand image, there is ghosting that was subsequently removed as part of the retouching process using a variety of brush sizes. Misalignment was the result of hand holding the camera rather than using a tripod.

A misaligned 4-image stack taken using a phone camera. The stack was then pyramid rendered and completely focus retouched in Helicon Focus Pro
Learning Resources for Stacking
Rik Littlefield has a really excellent learning resources page on focus stacking his Zerene Stacker website.
For those who are more experienced: Focus Stacking Workflow with Exposure Blending
Tips and images by: Steve Campbell