Hints, Tips and Recommendations:
Soft Proofing, Printing and Colour Management
Soft Proofing
Soft proofing allows you to simulate, on your screen, what your image will look like when printed on a particular paper. You can use soft proofing either for your own printer or for lab printing using traditional photographic paper or giclée fine art papers.
Soft proofing can help to save you time and minimise costs by saving waste of ink and paper or wasted print orders to a printshop.
For an excellent tutorial article on soft proofing go to this page on Cambridge in Colour.
Printing
Printers, like monitors, can also be calibrated to produce a correctly standardized output that should closely resemble your screen view (when both are set up properly). Nevertheless printers cannot reproduce the luminance (brightness) of screen colours!
Print Lab vs Printing Yourself
If cost is a major consideration for you, it might prove more cost effective for you to upload your print images to a high quality lab. It is hard to justify the cost of low volume printing, of say 30 large prints per annum on cost grounds. ( See this video, Why Would Anybody Buy a Printer? ) The main reasons for printing at home doing is if doing so gives you pleasure, you want ultimate control, or you want very quick turnaround.
Using Printer Profiles
You can accurately specify how your printer should render the colours on a specific paper, with a specific set of inks by using a calibration file known as an ICC colour profile. It is possible to download generic profiles profiles from the paper manufacturers and install them on your computer.
This very short example video show you how to install a generic profile from one particular paper manufacturer. There is another short video for Apple computers.
Creating Custom Profiles
If generic profiles are not good enough for you and you want a more accurate calibration for your printer and ink combination you can pay for someone to scan your calibration prints created using special colour swatch images. You can then send off your prints for scanning and receive a customised and accurate calibration file or ICC profile by email. Alternatively you can create an accurate profile yourself with a print calibration device. These devices are expensive and will probably not be cost effective for the average amateur photographer. (See the Datacolor print calibration device as an example).
Example of How a Professional Photographer Prints His Images for Sale
A Print Calibration Image Used Within Our Club
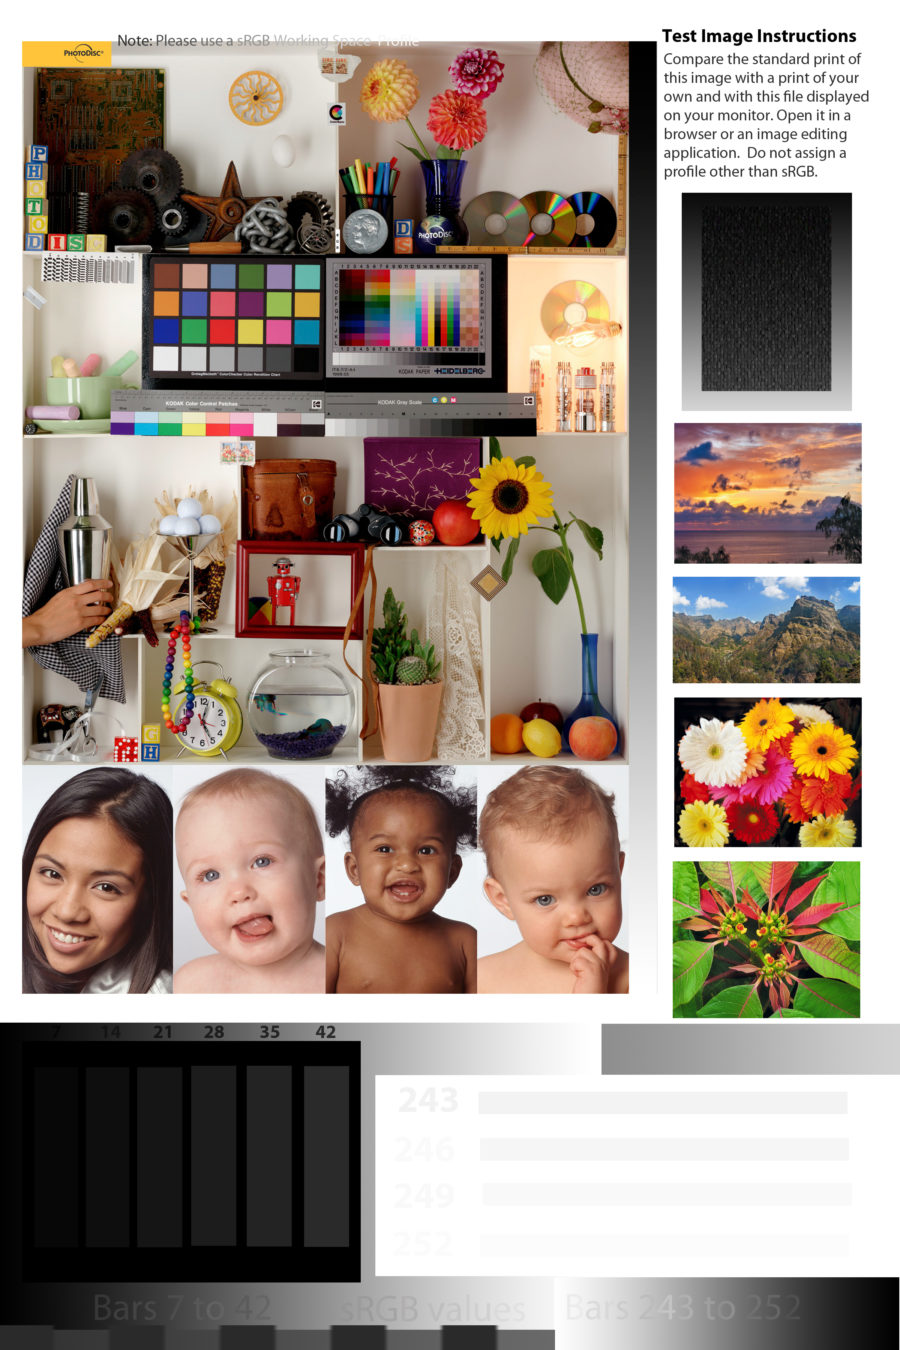
New members can borrow a properly printed version of the sRGB colour space image above from Steve that can be used to approximately verify screen calibration and printer performance. The top left panel was produced by Photodisc, now owned by Getty Images, and has a freeware licence. (PDI Freeware licence). The rest was produced by Steve.
When examining the image above be careful to look in a direction perpendicular to the screen, especially when using laptops or any desktop screen that has a very narrow optimum viewing angle. The print of the above should be illuminated by daylight.
Colour Management
Colour Management when done very precisely involves, capturing in RAW format from your camera then using profiled devices to see the final output correctly.
Viewing Conditions
The lighting used to view prints and any coloured object has an effect but there is not much we can do about it, as we can’t all have light booths. Ultimately the most important light source is the one with you intend to view or exhibit it.
The only thing an amateur can do is check test prints under a variety of lighting condition such as room lighting, under a desk lamp with a light source of known Colour Temperature (see our colour space page), window light, outdoors in the shade and under direct sunlight and under an overcast sky. By getting to know just one test print really well for each printer, paper and ink combination you have exhausted the reasonable possibilities for examination.
Hints and Tips by: Steve Campbell