Hints, Tips and Recommendations:
Screen Calibration
There is a Need for Display Consistency
If TV broadcasters did not show video to an agreed standard then you would have to fiddle with TV picture controls every time you changed channels. That would be intolerable and a complete waste of time. The solution is to have an agreed digital video broadcast standard with a particular colour range (REC.709) and well made displays that show broadcast television properly.
The same consideration applies to still photography. If we all use equipment that show colours in the same way and with the same contrast curve, we can then show and publish pictures so that viewers see the intended outcome of our work.
Apple Products
Expensive Apple products have excellent displays and reproducibility between devices, since they are being made for one company. If we amateurs all used Apple products then we would not have to bother too much about correcting the way images are shown on our own particular screen because they would appear very similar to all of us as when viewed on our own equipment . (For professionals who need very fine control of colour that does not apply.)
In general, recent Apple devices, including the iPhone camera, capture or display a very good colour balance and range of colours, and so are in less need of calibration than most Windows-based systems.
Display Correction (or Calibration) is Particularly Needed on Windows Computers
If you use a Windows system it makes sense to calibrate your display to an agreed standard. Note that you do not have to have a standardised brightness since some people prefer brighter screens or work in higher ambient light levels. Most professional photographers will ‘under run’ their displays at a much lower brightness than their (expensive) monitors will allow.
Members who have problems with screen calibration problems on Windows computers can ask Steve for help.
What Does Screen Calibration Actually Do?
For computers system with an an ordinary monitor, display calibration changes the output of the graphics card. It does so by creating a file called an ICC colour profile that is stored as part of the operating system. (For a good in-depth explanation see Neil Barstow’s article.)
On more expensive monitors the monitor itself can hold a correction in memory that is within the monitor. This is sometimes referred to as hardware calibration. The correction is sent from the calibration software (supplied by the manufacturer) by a cable that connects the computer and monitor. On one of the monitors I use there is an external control puck to select the colour space either monochrome, SRGB or Adobe RGB (1998)
Some very expensive monitors have their own in built pop-up calibration devices that carry out the whole process of hardware calibration.
Windows Laptops
Windows laptop displays often show a quite restricted range of colours. The newest club laptop as of 2017-18 only displays 62% of the standard sRGB colour space used on the internet or 47% of the Adobe RGB space, sometimes used to print images. (These terms are explained below and in Appendix 1 at the bottom of the page.)
Desktop computers and good quality well-calibrated monitors often produce a much more satisfactory output than laptops. iMAC retina displays, for example, can show a wide range of colours using the Apple Display P3 colour gamut which has a larger range than sRGB.
Try to avoid using a cheap Windows laptop for image editing. The display probably has a colour tint bias, which can usually be corrected by calibration. It probably does not even show the sRGB colour space, has too small a screen, and has a very narrow viewing angle, meaning if you watch the screen at the wrong angle the brightness will be way off.
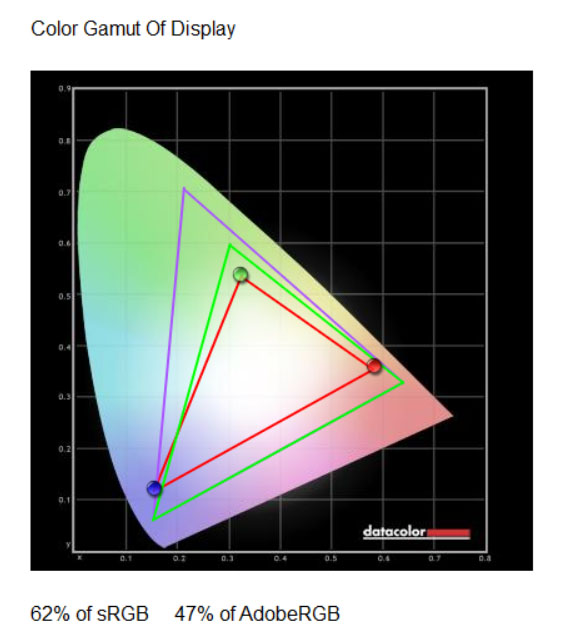
The most saturated or vivid sRGB colours (see explanation below) are disappointingly not viewable on the club laptop display visualised above. The red triangle represents the laptop performance against sRGB (green) and Adobe RGB (purple). Note that Windows laptops often do not display the complete sRGB colour range.
More Expensive Monitors
Some, more expensive, displays can use a great number of bits per channel and display the Adobe RGB (1998) colour gamut. I have one but, to be honest, I use it as 100% sRGB. You don’t need that range as Apple have demonstrated very well.
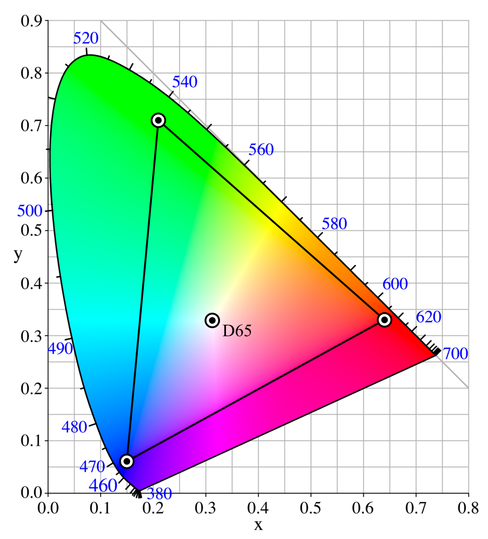
Adobe 1998 RGB colour space is indicated by the triangle in the diagram above
(image source https://en.wikipedia.org/wiki/Adobe_RGB_color_space).
Monitor Settings
1. Colour Temperature
If you wish to have a well standardised and calibrated system your screen colour temperature should be set to 6500K (or D65) using the controls on your monitor. These terms are explained in the screen colour page.)
2. Colour Gamut
For sharing on the internet or submitting images into competitions use the sRGB colour space (or gamut volume) that defines the range of colour that can be worked with and observed. The sRGB colour space should also be selected with the monitor controls, where that is possible (usually not on laptops). Many commercial printing services require images to be in sRGB encoded. Note that laptops often do not display the complete sRGB colour range (see the analysis of the club laptop below).
3. Gamma Value
If you can control the tone response, or more precisely the gamma correction value (on a desktop monitor), that parameter should be set to 2.2.This correction is needed because of the way cameras encode brightness values. The advantage of gamma encoding of brightness values is that it allows more grey values to be assigned to the dark tones when the camera is saving images as JPEG files. You can read more about gamma correction at the excellent Cambridge in Colour website or on Wikipedia.
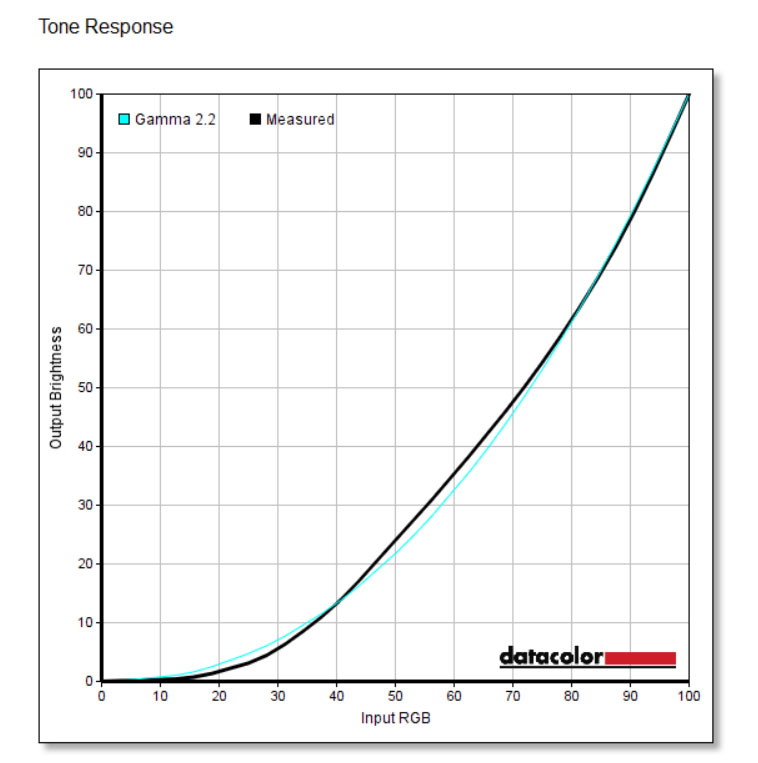
Analysis of the club laptop shows that, even after calibration (black line), it displays some dark tones too brightly and some light tones to darkly (shown as a deviation from the ideal coloured line).
4. Brightness
The screen should not be very bright, especially where the aim is to make images that can be printed. The best brightness will be depended on the ambient light level in the room. Screen brightness values of 80 -120 candela per square meter are a good starting point for the calibration process. A good calibration device and computer system will help you set screen brightness within a defined target range.
Club Calibration Equipment
The club has a ColorMunki Photo calibration device (now discontinued) that members can borrow to profile monitors, projectors and printers so that the output has the correct colour characteristics. You can download the i1Studio Software from X-rite to use the device.
Members could also consider buying their own more modern device from x-rite or one from another manufacturer such as Datacolor Solutions that produce the Spyder.

Calibration devices allow users to set up their screen properly for viewing, printing, sharing images and entering competitions. In the case of screen calibration, the calibration software that comes with the measuring device loads the calibration profile into the video card when the computer is started. On some expensive desktop screens, the profile can be written to memory in the monitor when the appropriate software and connection cables are used. Members should speak to Andy, our Equipment Custodian if they wish to borrow the device.
More About Monitor Calibration and Soft Proofing
Tips and some Image by Steve Campbell